OpenAI ChatGPTのモデル(gpt-3.5-turbo)を使ってみる

ChatGPTで使われているモデルgpt-3.5-turboが公開され、自作のプログラムからも利用可能となりました。合わせてモデルの体系も少し変化したようです。

驚くべきことに、以下の記事で紹介した”text-davinci-003”に比べて、コストが1/10になっています。自作プログラムに組み込む上では有難い価格になりました。性能は同等ということなので、ほとんどのケースでgpt-3.5-turboを使うことになってくるかと思います。

OpenAIの文章生成モデル(GPT-3 text-davinci-003) を使ってみる

Open AIは人工知能を研究する団体です。画像生成モデルのDALL-Eや、文章生成モデルのGPT-3などが有名です。先月、GPT-3の最新モデルが公開されたとのことですので、試して…

GPT-3.5

公式ドキュメントのModelsページにGPT-3.5が加わりました。davinciはGPT-3からGPT-3.5に変更されたようです。

LATEST MODELDESCRIPTIONMAX REQUESTTRAINING DATA
gpt-3.5-turbo
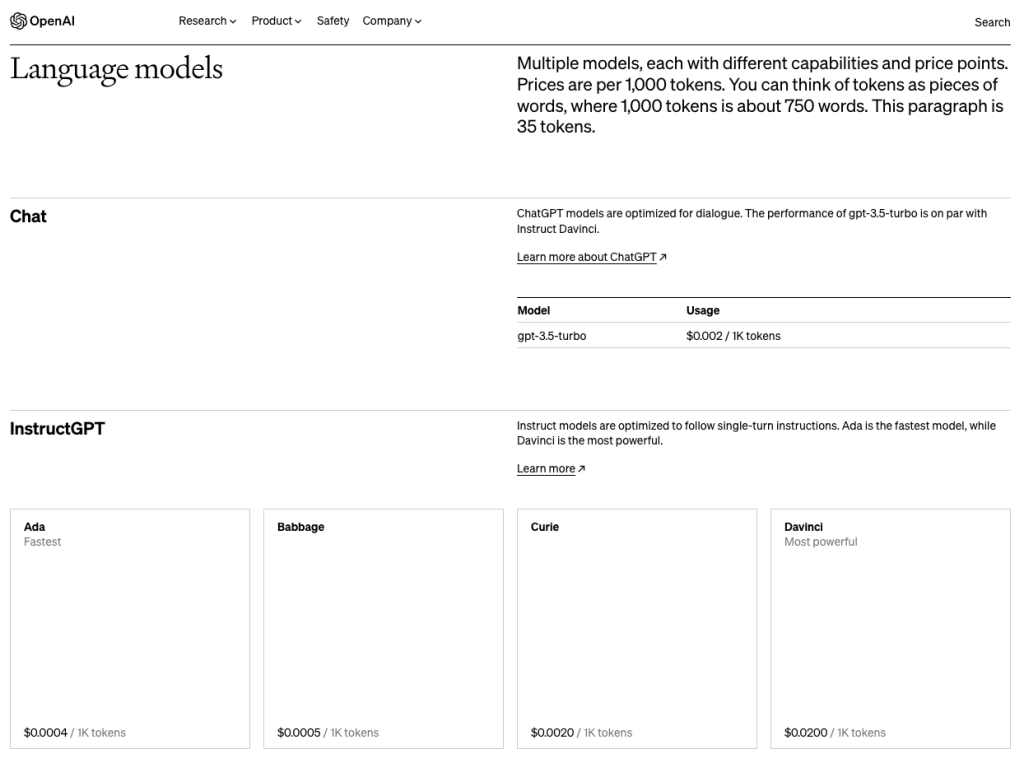
Most capable GPT-3.5 model and optimized for chat at 1/10th the cost of text-davinci-003. Will be updated with our latest model iteration.4,096 tokensUp to Sep 2021
gpt-3.5-turbo-0301Snapshot of gpt-3.5-turbo from March 1st 2023. Unlike gpt-3.5-turbo, this model will not receive updates, and will only be supported for a three month period ending on June 1st 2023.4,096 tokensUp to Sep 2021
text-davinci-003Can do any language task with better quality, longer output, and consistent instruction-following than the curie, babbage, or ada models. Also supports inserting completions within text.4,000 tokensUp to Jun 2021
text-davinci-002Similar capabilities to text-davinci-003 but trained with supervised fine-tuning instead of reinforcement learning4,000 tokensUp to Jun 2021
code-davinci-002Optimized for code-completion tasks4,000 tokensUp to Jun 2021
https://platform.openai.com/docs/models/gpt-3-5

一番上のgpt-3.5-turboがChatGPTでも使われているモデルです。chatタスクに最適化されたモデルになります。このモデルは、常に新しいモデルに更新されるようです。

既に多くの方がインターネットで紹介されているように、ChatGPTは翻訳タスクや感情分析タスクなどのにも利用可能です。

例えば、翻訳の場合、「次の文章を英語に翻訳して:・・・・」と入力すると、ちゃんと英語を返してくれます。

コスト、応答速度などを考えると、ほとんどの場合、davinciではなくturboモデルを使った方が良さそうです。より簡単なタスクを低コストで実行したい場合は、GPT-3のBabbageやAdaモデルを試してみるといいかもしれません。

APIの使い方

APIの使い方は、davinciとほぼ同じです。以下の記事ではdavinciモデルをAWSのChaliceを使ってLambdaで動作させる方法を記載しています。この記事をほんの少し変更することでturboを使ったChatサーバを立ち上げることができます。

OpenAI 文章生成モデルGPT−3のAPIを使ってみる

OpenAIのGPT-3の性能が話題となっています。Playgroundを使った利用に関しては、以下の記事を参照してください。 今回は、GPTの最新モデル(text-davinci-003)を使って、Ch…

本記事ではGoogleColaboratoryを使って、davinciとturboとの使い方の違いについてのみ記載します。

サンプルプログラム

サンプルプログラムはPythonで提供されていますので、GoogleColaboratoryを使って試していきます。

最初にopenaiライブラリをインストールします。 最新のバージョンopenai-0.27.0以上が必要です。

!pip install openai

OpenAIのOrganization IDと、API keyを取得して設定します。

Organization IDは、https://platform.openai.com/account/org-settings に表示されています。

API keyは、https://platform.openai.com/account/api-keys から取得できます。

import openai
openai.organization = "org-<Your key>"
openai.api_key = "sk-<Your key>"

以下にサンプルコードを記載します。

「日本人選手で一番人気があるのは誰?」が、userからの入力です。

import requests
import json

# Note: you need to be using OpenAI Python v0.27.0 for the code below to work
import openai

response=openai.ChatCompletion.create(
  model="gpt-3.5-turbo",
  messages=[
        {"role": "system", "content": "You are a helpful assistant."},
        {"role": "user", "content": "Who won the world series in 2020?"},
        {"role": "assistant", "content": "The Los Angeles Dodgers won the World Series in 2020."},
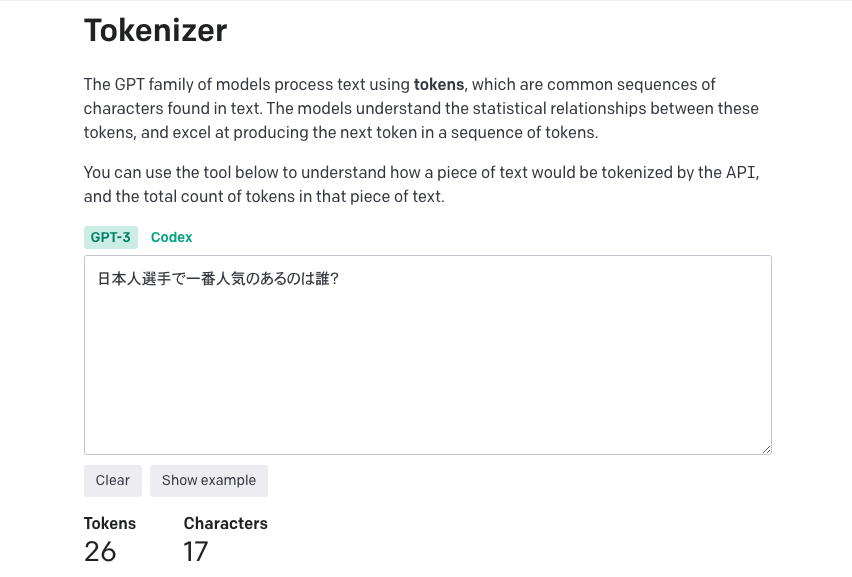
        {"role": "user", "content": "日本人選手で一番人気があるのは誰?"}
    ]
)
print(response['choices'][0]['message']['content'])

実行すると、以下のように応答します。野球の話の続きなので、「日本人選手」と言うだけで「野球選手」のことを話してくれています。

日本人選手で最も人気があるかどうかは、多くのファンの意見によって異なる可能性があります。しかし、一般的にはイチロー選手が日本人選手の中で最も人気があるとされています。彼はプロ野球界でも非常に成功し、日米での長期間にわたる活躍によって多くのファンを獲得しました。

davinciの場合には、入力promptとして単一の文字列を渡していましたが、turboの場合には、messagesとして上記のようなchat形式の配列を渡す必要があります。

The main input is the messages parameter. Messages must be an array of message objects, where each object has a role (either “system”, “user”, or “assistant”) and content (the content of the message). Conversations can be as short as 1 message or fill many pages.

Typically, a conversation is formatted with a system message first, followed by alternating user and assistant messages.

The user messages help instruct the assistant. They can be generated by the end users of an application, or set by a developer as an instruction.

The system message helps set the behavior of the assistant. In the example above, the assistant was instructed with “You are a helpful assistant.”

The assistant messages help store prior responses. They can also be written by a developer to help give examples of desired behavior.

Including the conversation history helps when user instructions refer to prior messages. In the example above, the user’s final question of “Where was it played?” only makes sense in the context of the prior messages about the World Series of 2020. Because the models have no memory of past requests, all relevant information must be supplied via the conversation. If a conversation cannot fit within the model’s token limit, it will need to be shortened in some way.

https://platform.openai.com/docs/guides/chat/introduction

roleはsystem, user, assistantの3つです。assistantがAIの役割です。

最初にsystemでどのような会話をするのかを定義して、userのcontentを入力として、assistantのcontentを返します。systemからのcontentよりもuserからのcontentの方が強く影響するようです。

このほか、各種パラメータも設定可能です。例えば、生成するトークンの最大数を指定するmax_tokensや、ランダム性を制御するtemperatureなどです。

詳しくは、こちらのページを参照してください。

Tokens

モデルの説明では、turboはdavinciに比べて1/10のコストになると書いてありました。

具体的な価格の記載は以下にありました。

https://openai.com/pricing

turboモデルのコストは、1000トークンあたり、$0.002とのことです。

トークンとは、文章を処理するために分割した単位です。

引用したページには、「1000トークンは約750ワードになり、この段落は35トークンになります」と記載されています。これを考えると、かなり安く思いますが、2つほど気になることがあります。

  1. 日本語のトークンと、英語トークンは同じ?
  2. 入力のトークンだけでなく、出力のトークンも含まれる?

まず、英語と日本語との違いを見るために、Tokenizerのツールを使います。

先ほどの文章を入力してみます。

文字数は17ですが、トークン数は26となりました。英語ならば、文字数よりトークン数は少なくなるのですが、増えてしまっています。日本語コード(Unicode)なのでこのツールが使えないだけなのかもしれません。

次に、先ほどのサンプルコードで得られるresponseを全て出力してみます。

{
  "choices": [
    {
      "finish_reason": "stop",
      "index": 0,
      "message": {
        "content": "<省略>"
        "role": "assistant"
      }
    }
  ],
  "created": 1677825267,
  "id": "chatcmpl-***************:",
  "model": "gpt-3.5-turbo-0301",
  "object": "chat.completion",
  "usage": {
    "completion_tokens": 130,
    "prompt_tokens": 70,
    "total_tokens": 200
  }
}

"usage":に、以下のように処理したトークン数が記載されています。
  "completion_tokens": 130,
  "prompt_tokens": 70,
  "total_tokens": 200

コスト計算に使われるのは、total_tokens=200 のようです。

従って、$0.002で、この程度の小さな会話が数回できそうです。(毎回出力が変わるので、あくまでも概算ですが)

実際に使ったトークン数は、OpenAIのManageAccountのUsageページで確認することができます。

また、コストも大事ですが、トークンの最大値を超えてしまうと、文章が途中で途切れてしまうので、プログラミングに際してこの値のチェックは必要だと思われます

追記 ChaliceのCORS設定

以前にも記事化しておりますが、自作のAPIにflutterのwebアプリからアクセスした際に、XMLHttpRequest errorが発生する場合があります。この場合、API側での対応が必要となります。

Flutter webアプリのXMLHttpRequest error(CORS)

FlutterはiOS,Androidだけでなく、Web ,Windows,Macのアプリも共通の環境で開発できることが、特徴です。 今回、iOSの音声チャットボットアプリをベースに、webアプリに改…

この記事では、Flaskアプリの場合の対処法について記載しております。Chaliceの場合には、公式ドキュメントにCORSの設定方法が記載されておりますので、こちらを参照してください。

CORS

class CORSConfig(allow_origin='*'allow_headers=Noneexpose_headers=Nonemax_age=Noneallow_credentials=None)

CORS configuration to attach to a route, or globally on app.api.cors.

from chalice import CORSConfig
cors_config = CORSConfig(
    allow_origin='https://foo.example.com',
    allow_headers=['X-Special-Header'],
    max_age=600,
    expose_headers=['X-Special-Header'],
    allow_credentials=True
)

@app.route('/custom_cors', methods=['GET'], cors=cors_config)
def supports_custom_cors():
    return {'cors': True}

New in version 0.8.1.allow_origin

The value of the Access-Control-Allow-Origin to send in the response. Keep in mind that even though the Access-Control-Allow-Origin header can be set to a string that is a space separated list of origins, this behavior does not work on all clients that implement CORS. You should only supply a single origin to the CORSConfig object. If you need to supply multiple origins you will need to define a custom handler for it that accepts OPTIONS requests and matches the Origin header against a whitelist of origins. If the match is successful then return just their Origin back to them in the Access-Control-Allow-Origin header.allow_headers

The list of additional allowed headers. This list is added to list of built in allowed headers: Content-TypeX-Amz-DateAuthorizationX-Api-KeyX-Amz-Security-Token.expose_headers

A list of values to return for the Access-Control-Expose-Headers:max_age

The value for the Access-Control-Max-Ageallow_credentials

A boolean value that sets the value of Access-Control-Allow-Credentials.

https://aws.github.io/chalice/api.html?highlight=cors#cors

上記引用コードにあるように、cors_configを設定し、@app.routeの引数に”cors"を加えることで、この問題は回避できます。